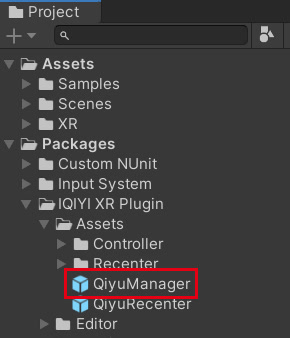
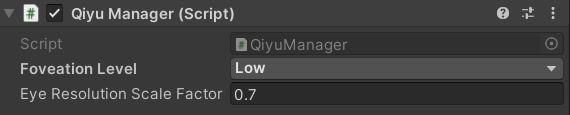
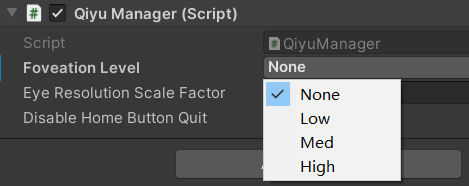
This guide introduces some common features that Qiyu provides for developers. please drag the QiyuManager prefab into the scene, which located in Packages/QIYU XR Plugin/Assets/QiyuManager.prefab directory.
The higher the Foveation Level, the higher the FPS, but the more the pixel loss, which will affect the clarity of the edge area, please choose the appropriate Level according to the rendering needs. Refer to 3.6.1 Foveation Rendering(opens new window) for more details.
A value of 0.7(recommended) will use the default eye texture resolution specified by the XR device. The lower scale value, the lower resolution eye textures, which can improve performance at the expense of a less sharp image. The higher scale value, the higher resolution eye textures, resulting in a potentially sharper image at a cost to performance and increased memory usage. Please not exceed 1.0.
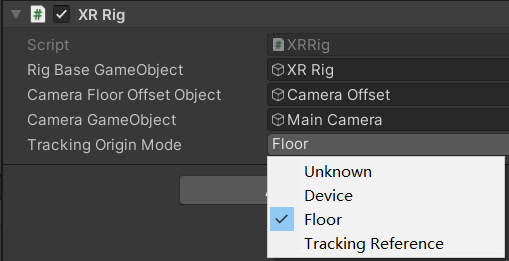
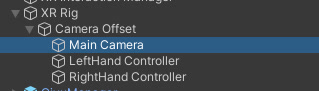
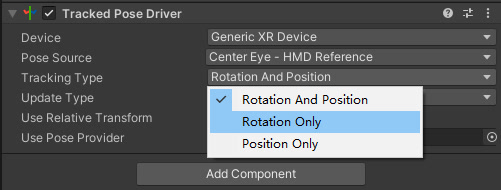
HMD 3Dof:Select "MainCamera" under XRRig, and set "Rotation Only" in "Tracking Type".
Controller 3Dof:Call the API Utils.SetTrackingPosition(false).
Fig 3.3.3 Switch to HMD 3Dof Mode
Tips: The effect of 3Dof is unnatural, because there are not neck model and arm model in the "Track Pose Driver" from Unity XR. We suggest the developers use QIYU 3Dof APIs, which includes the neck and arm models, to simulate the body movement vividly. Please refer the 4.4 QIYU 3Dof Mode(opens new window).
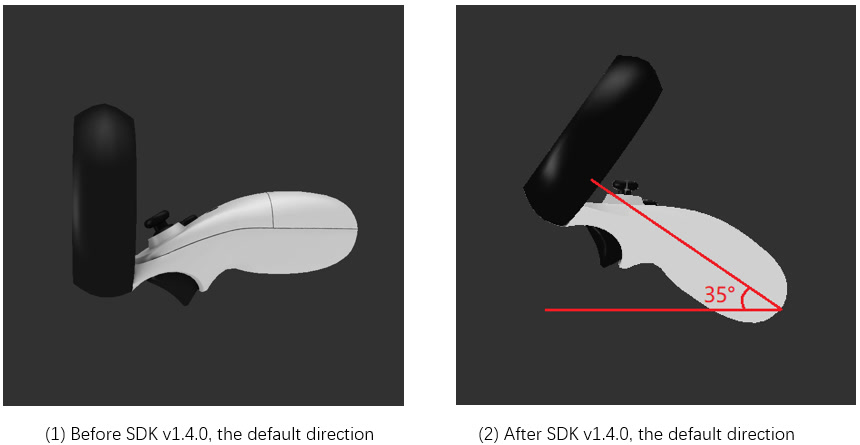
Please note: to improve the user experience of controller, we change the deviceRotation (set the 35 degrees as default) from v1.4.0. Please refer to the following figures. If you have already changed the angle for the controllers, please modify your angle back 35 degree after you upgrade the SDK.
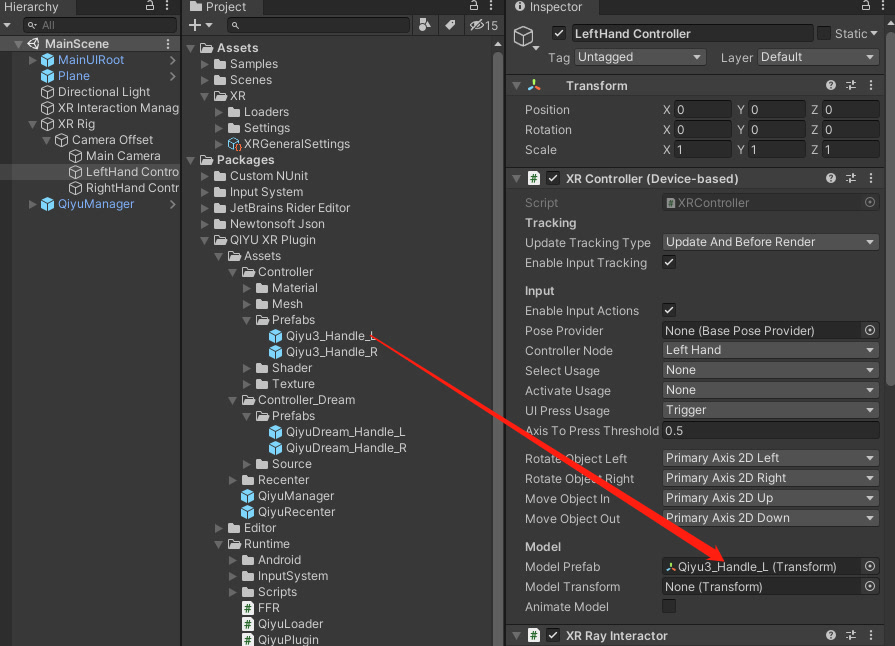
If you want to use the QIYU Controller models in the scene, please drag The controller model to specify Model Prefab location of XRcontroller.
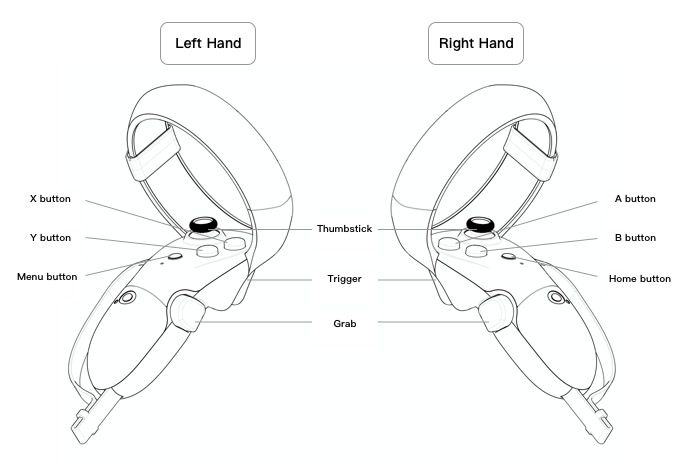
Fig 3.4.2.1 QIYU Controller
Fig 3.4.2.2 QIYU Controller Config
Notes:
If you using QIYU Dream to develop your application, please using the controller models at Controller_Dream file in Model Prefab.
If the QIYU controller Model needs to be used in your application which is also released on QIYU APP Store, the application should filling the right controller model in the Model Prefab.
Demo:
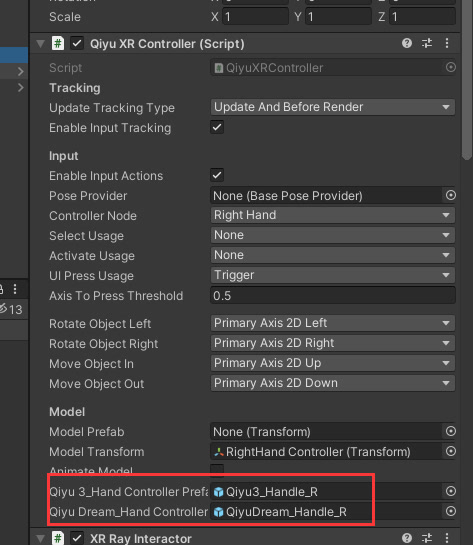
QiyuXRController scripts can instead the default XRController to switch the models automatically (Programming for this function by the device types) . The prefabs of controller models should be dragged to the model prefab as the Fig3.4.2.3 shows.
Fig3.4.2.3 Switch controller models by controller types
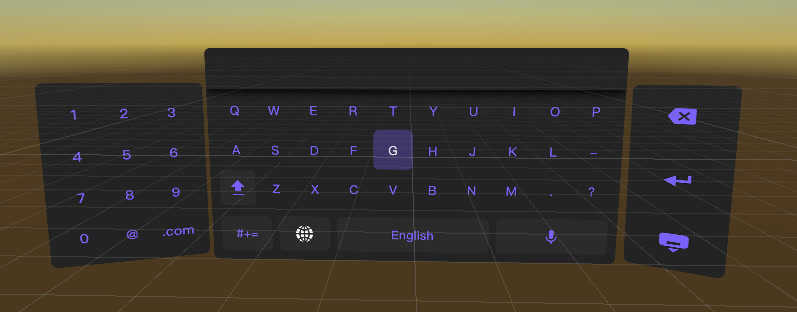
SDK provides a VR input keyboard, which helps developers to place virtual keyboards in their applications.
Drag the VrinputField Prefab into the UI.
Click the component to pop up the virtual keyboard.
Please refer to the "SGKeyboard.Unity" sample scene.
Fig 3.4.3.1 VR Input Keyboard
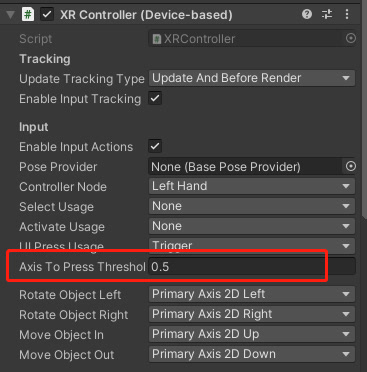
You can adjust the sensitivity parameters if needed. In order to improve the keyboard operation experience, it is recommended that the gamepad button threshold should be 0.5 in Device-based mode.
Fig 3.4.3.2 XR Controller Inspector
Set the left and right hand input. If you only need to use one, you can set the other value to NULL.
Fig 3.4.3.3 Keyboard Script
(Required)"Active Input Handling" in "ProjectSettings" must be set to "Both".
Resonance Audio is a multi-platform spatial Audio SDK that provides high-fidelity, powerful spatial Audio technology. It is a great help for real-life VR gaming and video experiences.
The download link is https://resonance-audio.github.io/resonance-audio/develop/unity/getting-started.
QIYU devices support multiple third party audio plugins, such as FMOD, Wwise, Photon voice and so on. however, some of default settings are not compatible with QIYI OS, which will cause the recorded video no sound. Please refer to 6.8 General Audio Plugin(opens new window) to modify the settings.
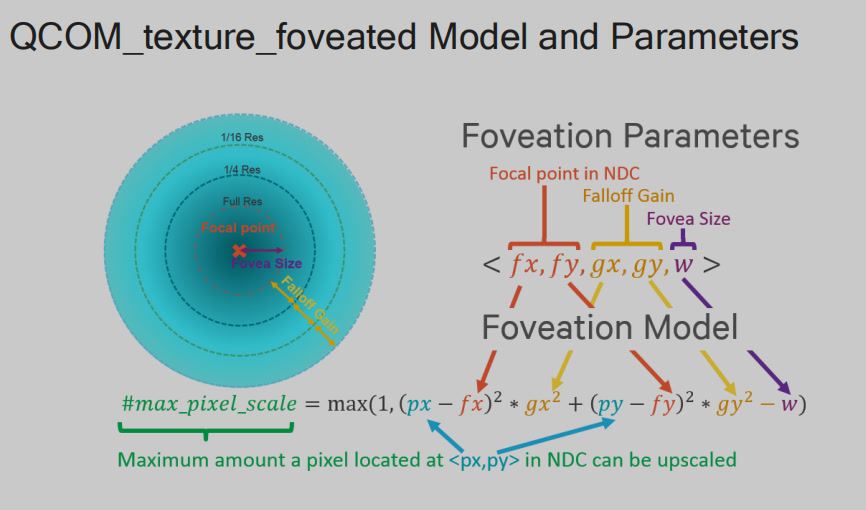
Foveated rendering can optimize the ability to render scenes by providing high resolution for the center of the field of view, and greatly reducing peripheral views the details of the scene. This reduces the GPU load as a result of the reduction in pixel shading requirements. FR can dramatically increase performance, improving the image show in the headset.
Fig 3.6.1.1 Foveation Rendering Model and Parameters
"Foveated Rendering" option as shown in the image below. Choose a Foveation Level other than “None” and then foveated rendering is enabled.
Fig 3.6.1.2 Foveation Rendering Settings
Developers can also set the fixation rendering level and parameters through the APIs provided in 5.1 FR APIs.
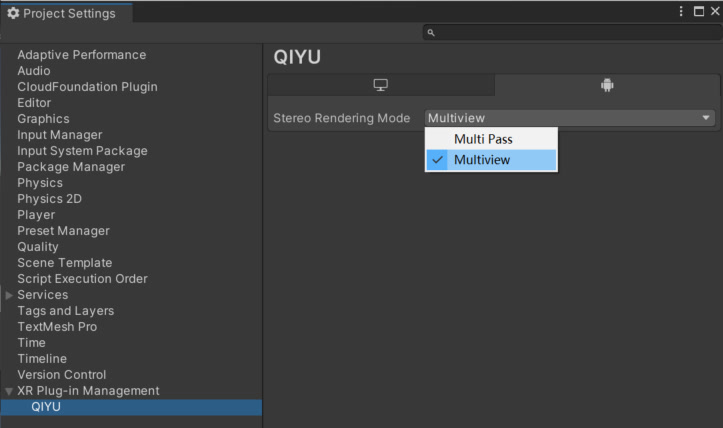
With Single Pass Stereo rendering (https://docs.unity3d.com/Manual/SinglePassStereoRendering.html), objects are rendered once to the left eye buffer, then duplicated to the right buffer automatically with appropriate modifications for vertex position and view-dependent variables such as reflection. It primarily reduces CPU usage, and the GPU performance is unchanged largely. If your application is CPU-bound or draw call bound, we strongly recommend using Single Pass Stereo rendering to improve performance.
You can select "MultiView" in Project Settings->XR Plug-in Management ->QIYU. MultiView takes effect globally.
Vulkan is a modern graphics API, in many ways the successor to OpenGL ES. It has numerous benefits, both from an API design perspective, as well as possible performance improvements. Any performance benefits that you might derive from Vulkan will only be of rendering CPU performance, not of GPU performance.
You can enable "Vulkan" as follow:
Open Unity Editor -> Build Settings -> Player Settings -> Settings for Android.
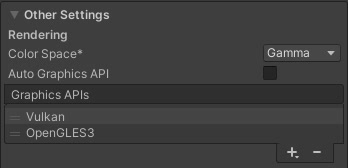
Open Other Settings,and disable Auto Graphic API. Add Vulkan in Graphic APIs List.
Place Vulkan on top of OpenGLES.
Fig 3.6.3 Enable Vulkan
Known Issues
In the complex scene, the frame rate of Vulkan is lower than OpenGLES, we will fix this issue in the future version.
If enable the Vulkan and Multiview at the same time, please using the Unity 2020.3.14 or above version, otherwise, the UI will be abnormal.
If enable the HDR, Vulkan and Multiview at the same time, please using the Unity2021.2.8f1or above version, otherwise, the UI will be abnormal.
In URP project, if enable the Vulkan and Multiview at the same time, the screen will be black after switching scenes multiple times.
The Vulkan API does NOT support Foveation Rendering right now.
Compositor layers let you render certain forms of content such as text, video, or textures with higher quality than traditional eye-buffer rendering can achieve. Because this will increase the system load, using more than 5 overlay or underlay is NOT recommended.
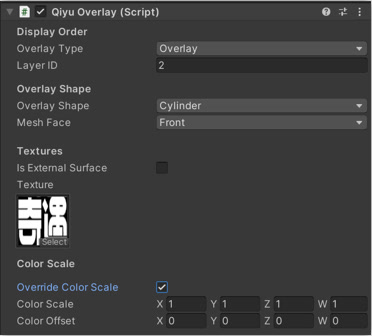
Overlay Type: Rendering types which include Overlay or Underlay.
Overlay: Will cover all the models in the scene.
Underlay: The compositor must punch a hole in the eye buffer with an special mask so that underlays are visible.
Layer ID: the order of rendering, Smaller values render first.
Note: The scene should follow the rule that nearby objects block distant objects to set Layer ID, so as to ensure the correct depth-of-field blocking relationship. Otherwise, there may be uncomfortable focusing.
Overlay Shape
Quad: Quad Mesh,layers are a flat texture with four vertices. Most commonly used as a panel to display text or information in a scene.
Cylinder: Cylinder Mesh, layers are a single texture that is wrapped around the camera in a cylinder. Most commonly used for curved UI interfaces.
Square: Square Mesh, layers are a single texture that is wrapped into a sphere and projected to surround the user’s view. Most commonly used for 360/180 video playback.
Customize: Customized type, the current Mesh can be used to render.
Mesh Face: define rendering the front or back of compositor layer.
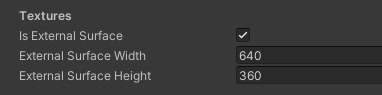
Is External Surface: to identify that the layer will be used to pass through textures or video from an Android Surface. Use External Surface Width and External Surface Height to define the size of the output, and the SetAndroidOESTextureID(int oesID) should be used to set the texture ID. Please refer to the Fig 3.7.2.2.
Fig3.7.2.2 External Surface
Override Color Scale: Override any global color settings for the compositor layers.
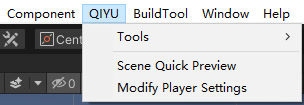
If you need to add additional content (such as permissions) to the Manifest file, click "Menu-QIYU-Tools-Create Manifest" to generate the Manifest file. Refer to Step 9(opens new window) of Quick Start for details.
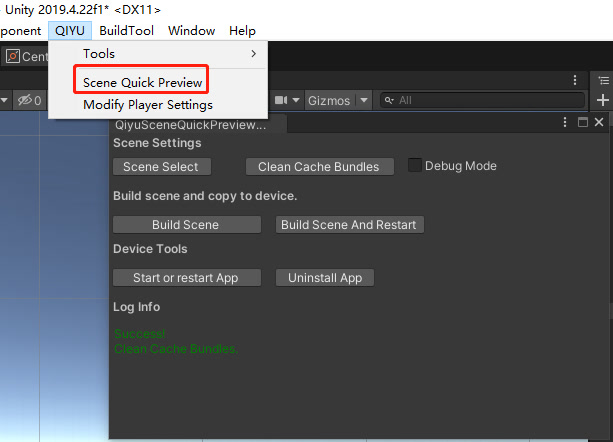
To improve the efficiency, Scene Quick Preview can help developer to check the effects on the device, build with AssetBundle. If the codes are changed during preview, the application should be reinstalled.
Fig3.9.1 Quick Preview
Function Description
Scene Select: Select the scene need to be built.
Clean Cache Bundles: Delete the QiyuAssetBundles which is same level with Assets.
Debug Mode: Enable the Debug.
Build Scene: Build a scene as AssetBundles. If the apk has been already installed on VR device, just copying the AssetBundles into device. If the apk has not been installed, the apk will be installed into device and run. If the apk is running, the application will be reloaded the new resources.
Build Scene And Restart: Copy the AssetBundles into device and restart the application.
Start or restart APP: Start or restart the application.
To improve the porting efficiency and prevent to build the package many time during the developing, PC direct Preview will provide a function running the scenes in Unity Editor, and you can also see the running views on the headset.
Pressing the "Play" in Unity Editor, and run the scene.
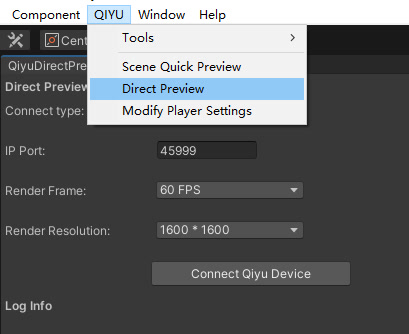
Select QIYU-Direct Previews in QIYU, and open the setting dashboard, you can please refer to the intrduction as below.
Pressing the "Connect Qiyu Device" button, connect QIYU device, and the Preview Agent application will be started automatically.
The synchronous display of the scene will be shown both in PC and Headset.
Fig 3.9.2 PC Direct Preview function interface
Description for Settings
Connect Type: USB connection is only accepted at the moment.
IP Port: Data forwarding port of computer and all-in-one machine. If it is not necessary, this configuration item does not need to be modified.
Render Frame: The frequency of the computer sending data to the all-in-one machine controls the display frame rate of the all-in-one machine, so the rendering frame rate of the computer is not consistent with the display frame rate of the all-in-one machine.
Render Resolution: Rendering resolution, monocular size of eyebuffer used for engine rendering and all-in-one display. The higher the rendering resolution, the clearer the display effect and the lower the frame rate. Please balance the weight of frame rate and sharpness and choose the appropriate rendering resolution.
Known Issue:
Some graphics cards ( AMD 5600XT and lower models, Nvidia 1060 and lower models), and some types of CPU (Not higher than intel i7-6700 or same level of AMD CPU) may cause latency.
Using Unity2019 or Unity2020, when turn to ActionBasedController scene, the screen will be stuck, and both headset and controller cannot be tracked.